Portrait Photography Tips: Lighting, Posing, and Composition in Tropical Locations


Similar to many photographers these days, I did not study at an art/photography institute. I didn’t even get my degree in a visual art field. True, I took two semesters of elective photography classes while at college, but most of what I’ve learned about this trade and art form came from working as an assistant to other professional photographers and teaching myself how to edit from various online resources.
So, in an effort to give back to the online community that helped me, I’ve made it a point to create fun mini-guides and shareables for other aspiring photographers. Today I wanted to expound on each of the pocket guides that I’ve posted on my Instagram page. Hopefully it’s useful for those who are developing their business or even just their photography hobby!
Junlge Locations & Environment

Why Jungle Locations Photograph So Well : filtered canopy light, layered depth and framing, enclosed and often more private
Even if you don’t live and primarily photograph in a tropical location that offers a jungle-like enclosure, you can still benefit from these pointers! Anywhere that has any sort of concentrated nature (parks, backyards, etc.) can work. I am a big advocate for natural lighting, which is why shooting outdoors can make for such gorgeous, dynamic portraits.
I love jungle locations because you can typically shoot there at more times of the day than other, more “exposed” spots. Here in Hawaii, I really only love shooting at sunrise or around sunset. Even then, those times can come with some harsh lighting. However, with the filtered canopy light in a jungle location, you don’t always have to be as strict with timing since you’re offered more diffused lighting options. With that being said, cutting a shoot too close to sunset in such spots can actually prove to be too dark and harder to get optimal exposure. In these cases, I try not to lean too heavily on knowing that AI de-noise tools are better than ever, even though that’s tempting (since I’ll usually have to really raise my ISO settings).
Overall, doing a portrait session in a jungle location has so many unique elements that other spots lack. Greenery offers endless opportunities to compose your portraits with a lush foreground and background. I have yet to find a way to get much foreground at, say, a beach shoot. Vegetation adds such a dreamy layer to play around with and offers cinematic depth. Don’t forget to bring mosquito spray for both you and your client! Now go have fun frolicking around with your camera in the jungle :)
Light & Exposure

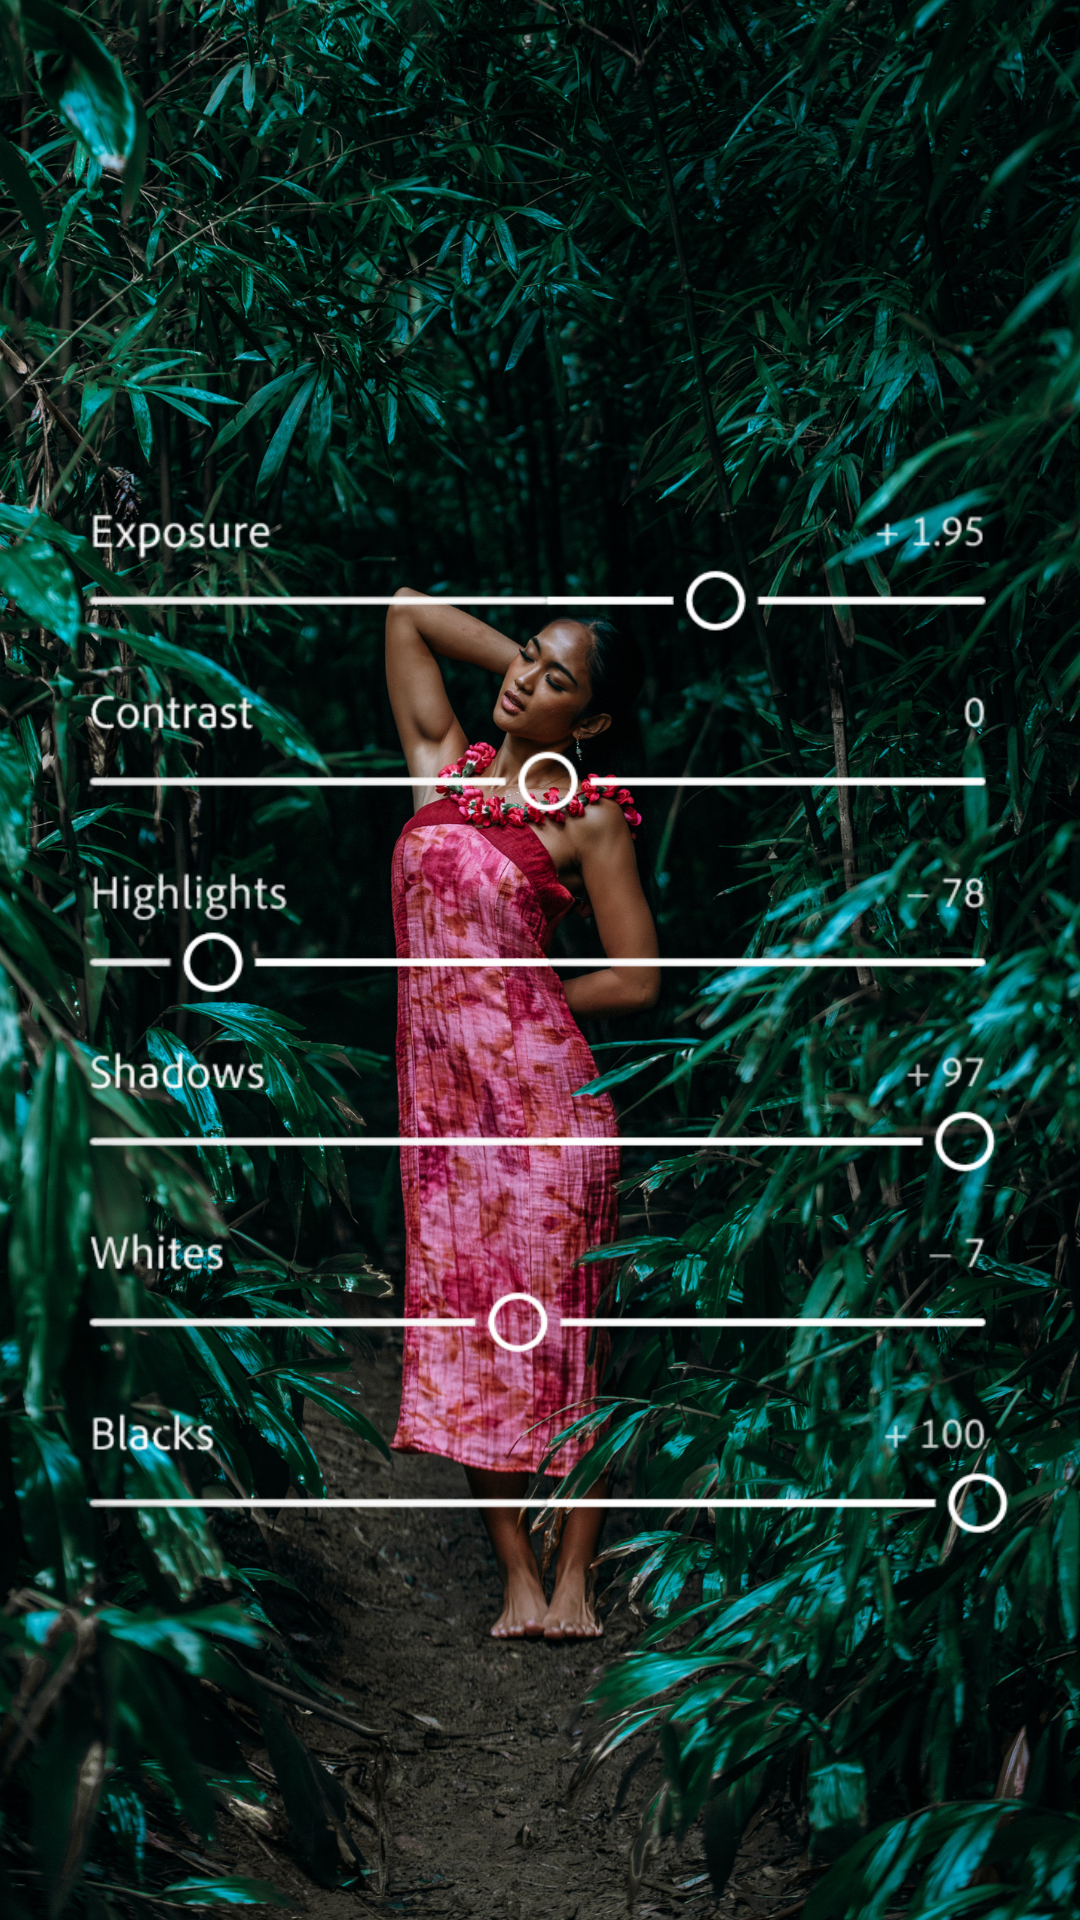
Actual Lightroom settings overlayed on an outdoor portrait by Flora and Femina on Oʻahu
Every photo is obviously very different when it comes to what you’ll need to adjust lighting-wise. I always loved knowing what other professional photographers preferred to do with their editing flow just out of sheer curiosity. I do think it’s fun analyze a photo and guess exactly how each aspect of the lighting was changed. Since you’re only given the final image here and not the raw, it’s clear that my original photo was pretty dark/underexposed (since both the overall exposure and blacks were significantly increased).
One main rule of thumb I have for beginner photographers is to remember the following: however you choose to tweak your exposure settings in post, make sure you always maintain white details and black details. By this I mean that anything in the photo that is white should not be too bright to the point that you lose any texture, lines, etc. The same goes for anything black - it shouldn’t be too dark to the point that you can’t see detail. This is most important when it comes to clothing, objects, or the subject’s complexion.
With the way that I edit, I will even tell clients that my style looks best and most natural if they choose to wear vibrant, colorful outfits instead of anything white or black. Having concentrated whites and blacks throws off how I’m able to edit the photo as a whole. Of course if my client has an outfit they absolutely love that has a white or black piece of clothing or accessory, I’m not going to tell them they can’t wear it. But, you’ll come to find that you might have to edit blocks of white and black in a separate mask to maintain those details and to clear any other “color pollution” that might appear when you start adjusting temperature and vibrance.
Camera Settings

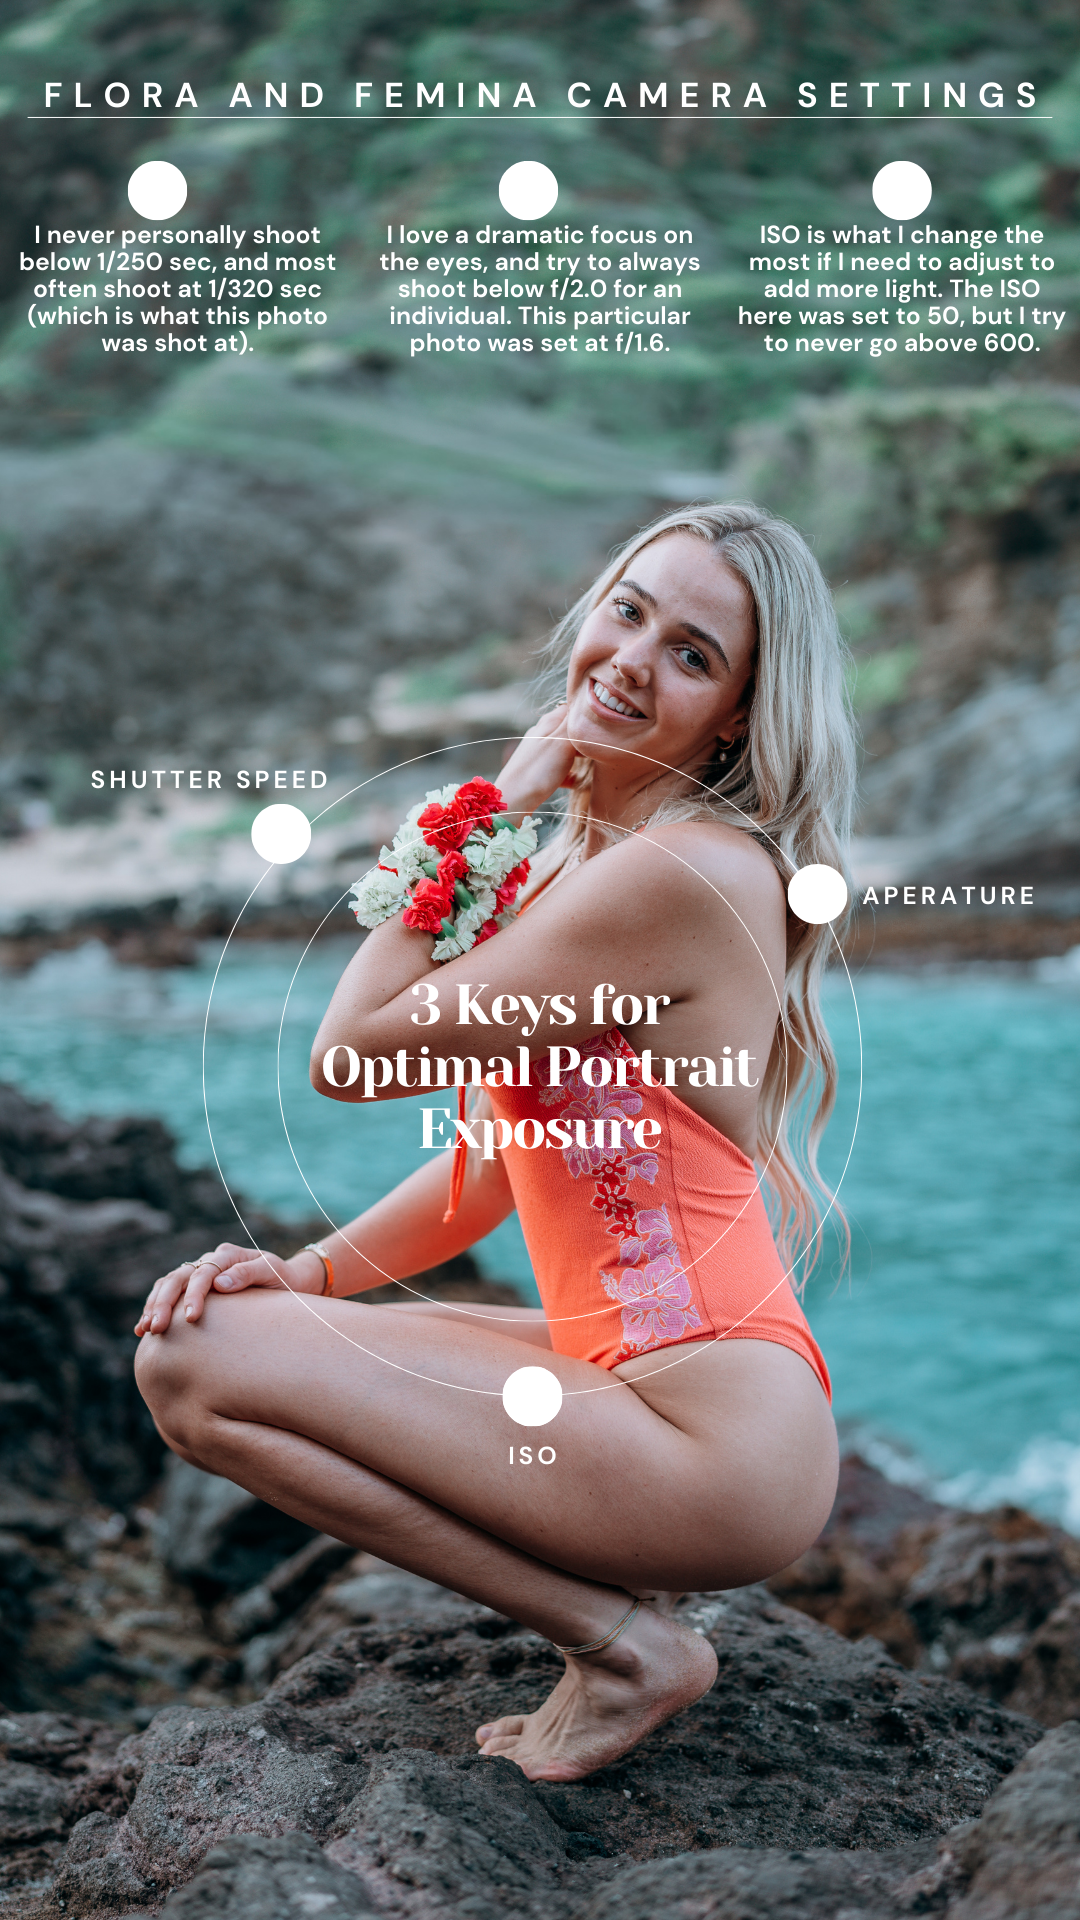
Flora and Femina Portait Photography Camera Settings for Optimal Exposure
I want to start my explanation for this mini-guide by saying that this photo was shot on a Sony Alpha a7 IV camera body with a 35mm Sony lens. When I used to shoot on a Canon 5D Mark III camera, my settings may have been quite different! Exact camera settings for portraits vary from photographer to photographer, but I tried to explain why I chose the settings I did since it all plays into my style and brand. I also want to add that my favorite lens to use for portraits is actually either a 85mm or a 70-200mm lens. I prefer the way those two lenses compress and flatter facial features. However, when I’m shooting portraits in these stunning outdoor locations, I also want to show off as much as the background to add to the drama of the shot. So, that’s why I used a wide-angle lens here like a 35mm.
Here is an even more detailed guide of shutter speed, aperture, and ISO to piggyback off of this mini-guide:
The lower the shutter speed, the more light your camera will let in, but the image will be less sharp. The higher the shutter speed, the less light, but the more crisp the image will be (faster shutter speed freezes motion).
The lower the f-stop/aperture, the more light there will be and the more honed-in focus on a particular plane. When the aperture is higher, more planes will be in focus, but less light will be let in. Wide aperture (lower f-stop/aperture) = shallow depth of field. Narrow aperture (higher f-stop/aperture) = deep depth of field.
ISO is basically the sensitivity of your camera’s sensor. So, if your ISO is lower, there will be less overall light but you’ll have little to no grain. If you need to increase the ISO, there will be more overall light but you may see more grain in the photo while you are editing.
Composition & Framing
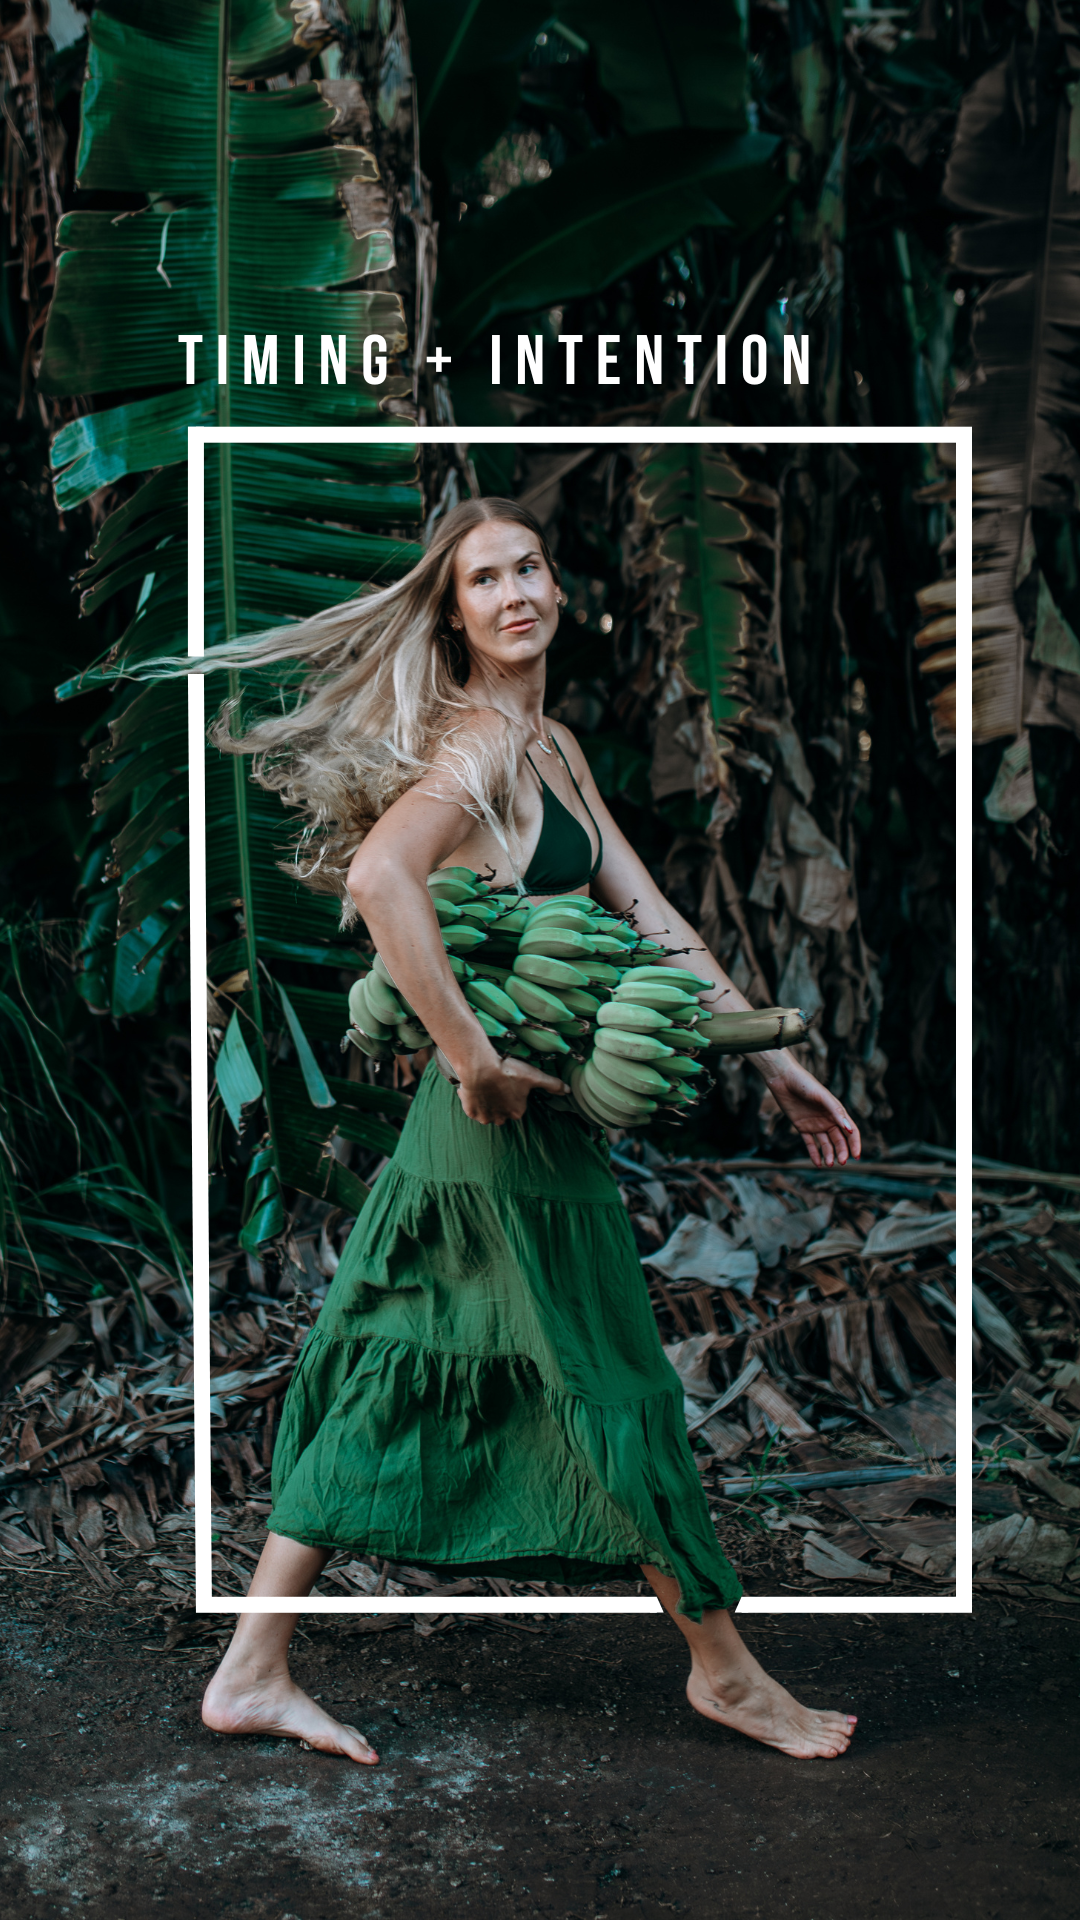
Add engaging and dynamic motion to your portrait when you intentionally time your shots
The more variety that you can incorporate into your portrait composition, the better! This is why photography is so special; you can freeze time and light in ways that many other art mediums can’t. When you don’t have options to create depth with an added foreground to your composition, you can create a similar sort of captivation by framing and capturing a planned motion. Here, I had the client walk and flip her head back after a couple of steps. I wanted to try something natural and not too unlike an action that a person would take. I’ve seen some portrait photography where the subject dips their head in water or colorful chalk and then flips their hair back, and to me that reads as a bit cheesy.
I do a lot of environmental portrait photography and love to try different motions like someone coming up out of water, or telling their story in a more authentic way. I suggest talking with your client and really figuring out what they are wanting to portray with their portraits. This can help guide you towards powerful ideas. Increase your shutter speed, and catch them in their unique and natural movements!
Creative Posing & Movement

Flora and Femina : Creative Posing Ideas Mini-Guide
Last but not least, try out some new poses at every portrait session! I compiled this little pocket guide of creative posing ideas that is pretty straightforward. I always try to make a point of doing a little research and identifying new poses that I haven’t tried yet. Once you do more shoots, you fall into a rhythm that you take your client through for posing. That’s great! And it feels good not to be glued to your notes list on your phone that you have to consult between every pose. However, try to prioritize finding new angles and asking your client if there’s any pose that they’ve seen and would like to try. Collaborating with, and not just solely directing my clients has led to some really unique shots that I wouldn’t have gotten if I hadn’t asked them about their ideas and empowered them with posing.
My goal is to create editorial, cinematic portraits of women, and most of us aren’t natural-born models and expert posers. The key is to connect with your client and to help them find and express their beautiful feminine energy. Not every great pose works with every person, so make sure to individualize your session by adjusting the client to show them off in their best unique light!
Thank you for reading along today, and never hesitate to contact me with any questions or inquiries. I love all things photography related and would love to work with you <3